Wednesday, October 12, 2011

How to quickly clean a cast iron Skillet


Okay! I absolutely absolutely love to cook in my cast iron skillets!  When I get the skillet going and throw in some bacon and eggs, the smell reminds me of spending time at my Grandma's house.  I'm not sure she has ever owned anything but cast iron, and she is the best cook in the world. I have often wondered how she stayed sane all these years cooking 3 square meals a day in cast skillets and then cleaning them everytime?
I believe cooking in cast gives things a different flavor and think it is amazing!

But the down side of cast iron (Or what used to be the downside) is the cleaning of it afterwards.  ANyone who has used cast knows that sometimes things stick to it if you're not careful. Especially scrambled eggs!! Why is that?  They are cooking along just fine, and you go to stir them and you have like 1/4 of an inch of egg permanently adhered to the bottom of your skillet?  My fried eggs don't do this. I believe it is one of life's mysteries!! Anyways, back to the topic of this tip! 

Cast skillets are not to be submerged into your dish water as the soap wil take off all that great "seasoning" you have worked so hard to build up on it. (If you need to know how to season a skillet I will post that later.)  So you are stuck with scraping, prying, and cussing, trying to get the stick stuff out. Using a scouring pad to chisel out the left over stuff, totally wrecking your beautiful fingernails in the process!!  Think my grandpa told me once, to go find some good clean sand and put it in the toe of an old panty hoses and use that to scrub them out???? Okay, that sounds tricky on lots of levels. One where the heck do you find "clean" sand and two, who has panty hose anymore! he he!

Well, that process is gone! No More! Frustration, Aggravation, and ruined nails.  I stumbled upon this little gem of a trick somewhere (think an old cookbook) and I believe  people have been keeping this as a secret for years! Nobody ever told me this!!

Ready! Here is the oh so simple way to clean your skillet. 
Step 1- fill dirty skillet with water. enough to cover the stuff stuck on the bottom, and a little extra. If there is stuff stuck up the sides add a little extra, and cover with a lid.
Step 2 - Bring the water to a full boil for around 2 minutes!  May vary depending on how stuck it is. You will see the food begin to float around and break loose. 
Step 3- Run under a little water and WIPE OUT STUCK FOOD!!!!  ***Remember the skillet is HOT and the water you are pouring out is HOT!! So use a potholder, and be careful!

YEP! That's it! I swear that is a well kept secret.! It works great! I usually put the skillet on to boil while I am loading the dishwasher and wiping down the countertops, and by the time I am done it is ready to wipe out!
Then all your left with doing is using a paper towel to dry any excess water and rubbing a little crisco in it and you have a perfectly cleaned skillet ready for it's next use!

I hope you enjoy this tip! I know I have! Thank you to whoever came up with this.

Tuesday, October 11, 2011

Pinterest!!!! UGHHHHH!!

So, am I the only one out there who has officially become addicted to Pinterest?  I sit down to try and accomplish something on the computer, and before I know it I have logged onto Pinterest!!!!! UGH!!!

30 minutes later, I am looking at the coolest stuff getting lots of great craft ideas, but basically accomplishing nothing!!! I have wasted the small window of time I have to spend on the computer before a tiny body plunks herself into my lap and says, "I Help u?"  I do have some great ideas pinned onto my boards, but will I ever have time to create these things!

So Frustrating! Yet I simply can't stop!!  Who created this!! They so totally rock, and suck at the same time!

I wasted a good hour yesterday when my little one who is still at home was napping sitting looking at peoples pins! I created absolutely nothing! I cleaned absolutely nothing!  SO I decided to stay up late while everyone was sleeping and get to cracking on some projects. And do you know what? I walked downstairs where my computer is at with the thought of printing off a pattern I had saved and logged onto.... yep you guessed it!! PINTEREST!! I am so totally obsessed!

Well bout 8 minutes later I realized the error of my ways, turned off the computer and walked up to my craft room.  3 hours later I had accomplished sooooomuch!   2 baby blankets, 2 crib sheets, 2 wreaths, and 4 headbands!! YEAH YEAH!  Maybe my obsession is over! ha anyone who follows my pins will be laughing at that because I was on there again today!

For those of you who have yet to check out this site??!!  Do so with great caution!  You will find so many fun, interesting, funny, yummy things there that it just might suck you into the vortex of obsession too!! It is basically a place where you can post to your "bulletin boards" anything you see on the web that you like! It will link it to you and have a direct link back to where you first saw! Great amazing resource!!

http://www.pinterest.com/      Proceed with caution!!!!

Kids Craft success!!??!

Well I conquered my first kids crafting class!! IT was a bit chaotic, but everyone had fun, created their own projects, and no one was injured!! Yeah!!  The first time you put yourself out there in a situation like this you have a little stress about wether you are capable to pull this off, and if you have chosen projects that are suitable for the age range of kiddos you have coming.  I learned several things from this first class.

Hot glue is an amazing thing for 7 year olds. The little whispy strings that you can create and then stretch across the room are simply put, Mesmerizing!  I am pretty sure I looked like I lived in a spider cave when I left for the night because I had strings of glue all over me. I would lean across the table to help a child, and the one that was standing next to me would pass the glue gun over my back to the girl on the other side of me, thus creating glue strings across my back and into my hair! Great!! And those of you who have seen me lately know my hair is already crazy so adding this affect really helped out!  Not really a big deal, but after awhile they are troublesome!!

I also now have a much better idea of what projects can be completed by different ages, and how long projects will take the kids to do.  I want to thank the parents that submitted their kiddos to my "guinea pig" class.  I learned alot from your kids, and I hope they had as much fun as I did!!

So I will be offering more crafting classes for kids! Yeah!  SInce the first time with 7 kiddos they each managed to create a fuzzy pumpkin, a pose-able mummy, and 3 bottlecap magnets. Everyone had fun, no one was injured and did I say it was fun!  Thanks again parents and kids! You Rock!

Check back often to see when the next class will be offered. Think a fall wreath project for adults, or maybe Christmas Present ideas for adults. and then we will go back to the kiddos for a Thanksgiving/fall class!!

Thanks
and Happy Crafting!

Thursday, September 29, 2011

Halloween Craft Class!!!

Halloween Craft Class!!

Date:   Oct 10th Monday
Time: 4:00 to 5:15ish
Place: Windom Church of Christ Building
East Kansas st. in Windom
Cost: $10.50 / child
Age:  7 and up

We will create 3 different Halloween crafts:
1 Fuzzy Pumpkin Spider


1 Pose-able Mummy
3-bottlecap halloween magnets

All supplies will be provided!


A Snack will be provided.
Please message me if you child would like to
attend. I will e-mail you a form that you will need to sign and return to me! It will fill on a first come first serve basis.
I will offer more if the first session fills up!!

Students of WES can arrive right after school for convenience and
have snack while they wait. Please be there to pick up
your children promptly at 5:15. Crafts take
varied time for each child so your child may be 5 min. later or so!
Come on in and watch.
Parents are welcome to wait inside, or outside, or they can watch
the fun!!

Thursday, September 22, 2011

Fuzzy Pumpkin Spiders!

Fuzzy Pumpkin Spiders!!

Each year I try to have my kiddos create a decoration for
the upcoming season! Not only is it fun to create with them
but it is fun to look back and see what they made in
the years past as you get the decorations out for the season!
 Since Halloween is fast approaching I thought it would be fun to make some spooky spiders to sit or hang around the house. 
 So I found some treasure in the craft room that we could use this year to create our:
FUZZY PUMPKIN SPIDERS!!
I saw something similar to this for sale at Michaels craft store, but thought it would be more fun to make them!
The older two had so much fun making them, Kate was too
little so I had to help her! (really she just played with the
pipe cleaners, but hey! She was happy!) So here is a guide
for you and your little ones to follow in creating your
own! 
This requires a low-temp glue gun so please supervise.
Best for ages 5 and up!


Here is what you will need:

-googley eyes *Sorry I didn't get these in the picture** however many
your little one wants his/her spider to have
-part of a feather boa (depends on your pumpkin size, will need enough to wrap around it
and cover the pumpkin. I divided mine into 3 pieces as we had little pumpkins.
-9 black pipe cleaners
-low-temp glue gun and extra glue sticks
-fake pumpkin (mine are the small ones)
- pieces of felt in a dark color :  2pieces that will go from stem to bottom edge of pumpkin  
1 piece about an inch square
2 pieces big enough to fit your spiders eyes on. I cut mine alittle big to make it easier
to get the eyes glued to them. you will trim it off later!
 (black, green, blue, whatever you have that won't
show up to much through the boa)
-scissors * sorry not pictured either**

Okay! Here is what you do to create your spider!

Step 1: 

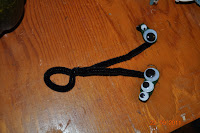
 Take 8 of the pip cleaners and create legs! Hold the pipe cleaner and bend so that the ends match up. Then twist the folded end leaving a little loop to be the spiders foot. Twist the two loose ends all the way down
until you reach the ends. Creating one leg! Do to other 7 to create your fuzzy legs!

                                                                    This is what it should look like!


Step 2!

                                              Using one of the felt pieces that will go from the
                                                stem to the bottom of the pumpkin, begin to hot glue
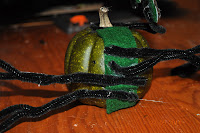
on the legs. Run  a nice thick line of hotglue across the felt shortways and attach the end of a leg. Press the leg firmly into the glue and hold for a second (be careful  not to glue your finger to the felt! ha!)                     Continue to glue four legs to each piece. We alternated directions so that spider had some legs going forward, and some going back.


You should have something like this when they are all glued on!


STEP 3!

Now you are ready to glue your eyes onto the pieces of felt you cut! It is easiest to put the glue onto the felt and then stick on an eye. Keeps fingers less sticky!  Stick them on however you like. There are no rules here!!

Once eyes are on carefully trim off the extra felt as close as you can!

Step 4!

    Now you are ready to hook your eyes onto the eye holders? Don't know what else to call these.  Take the last pipecleaner and bend the two ends in like this.  Place  hot glue on the felt on the back of the eyeballs and then glue it to the bent part of the pipecleaners.  Hold them there for a second or two to make sure they stick.


Step 5! 
 Now you simple place hotglue around the stem of the pumpkins and attach your eyes! Glue the loop of the eye pipecleaner around the stem. Adjust them now or wait until your boa is on. Doesn't matter..


Step 6! 

 Now you are ready to glue on the legs! Simply put hot glue, my kids used quite abit, onto the back of the felt that your legs are glued too and place on on each side of the pumpkin going up and down.

                            You should now have something like this!
                                          Beautiful! hee-hee!

Step 7! 
  Okay. Now you are ready to start attaching the boa, or the spider fuzz as my kids called it!  Place a good deal of hot glue onto the last piece of felt. the 1x1 ish piece.

Then stick one end of your boa into the glue and carefully hold down. Remember you are gluing feathers so it will come through to your fingers.


                      Then put glue on the back of the felt
              on the boa and glue it to the bottom of one
            of the felts that has legs on it!

Step 8! 

Last step! Slowly add glue and stick the boa to it, wrapping around as you go. We put glue on the felt of the legs, then inbetween the felt, and so on. Wrap your boa between the legs as you go. When you reach the top use a good dab of glue to get the very end to stick down by the stem!  You don't have to keep the boa wraps very close together since the fuzzyness of it will fill in the empty spots!


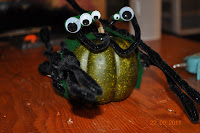
ANd Their you go! Your very own Fuzzy Pumpkin Spider!! 
Have fun! And keep on Crafting!


Falls Coming and My Slippers are Out!

One of my favorite parts of fall is the first day you go out to feed your animals and you realize, my feet are FREEZING!!!!  This morning as I ventured out in my orange plaid pj pants, old holey too big t-shirt of my hubbies, and my dependable brown flip-flops I realized something!  Okay I realized a couple things.

1. Man I need to invest in some decent jammies!
2. Man I am glad I live where neighbors can't see me in the mornings!
and finally
3. My Feet are FREEZING!!   YEAH!!!!  

In that moment I became so excited, because that is my official sign that fall is in the air!  I don't depend on the weather people,  they only recognize the area where I live when a tornado is going to blow us away (which I am thankful for) but for the most we aren't here, so since they ignore me I ignore them! I don't depend on the trees losing their beautiful leaves! That happened months ago because of the horrendous dry weather and heat!  I have always depended on my trusty toes, and this morning they were dancing for joy! (not actually dancing, my kiddos are embarrassed when I dance in the yard! Geesh!)

As I walked out to the barn to feed our kitties my toes told me that it was time to break-out the slipper shoes that I basically live in all fall and winter! Sorry Sara, I still haven't been able to locate a pair for you.  This are wonderful farm shoes! I have accidentally worn them out in public forgetting I have them on since they are so comfy! Whoops!  Nice and softly lined on the inside, not that terrible thick fuzzy stuff, who can wear those and not have their feet die of heat exhaustion (and odor)? These are soft flannel lined, fake sued-ish on the outside that cleans up nicely, and a hard rubber sole that lacks any serious tread! AWESOME!!  I realized their awesomeness quickly and hurried back to the store and bought a back-up pair, because if they are great they will  only have them for one year?!!?  Very puzzling concept for me!

For those of you who have to feed critters in the morning I am sure you quickly realize the amazing benefits of these shoes!  Not too fuzzy inside. This helps with the too hot problem, but also helps keep those little grass seed thingies that stick to everything and then poke the crap out of you later, from getting stuck in your shoe.  The easily cleaned outside, well that should go without explaining but here's a little. Animals equal: mud, sand, fur, and yep poop! Washable shoes are good!  And lastly the great bottoms that lack serious tread. That goes right along the same lines as the washable top. Where you have any type of out-door animal you have items that you really don't want attached to your shoe all day!

I try to approach all things in my life this way! Find what you like, what works for you, and stick with it!  And take the stuff that drags you down, and doesn't bring joy to your life and well, scrape it off your shoe!

So in short FALL has Arrived at our little homestead! I am sooo excited and ready. This summer has been long, hot, dry, hot, dry, and did I say hot! Our animals have gotten their spring back into their step as have I. They are awake, and moving and running for the feed dishes in the morning saying right along with me, "Woohoo!  My feet are cold!"  So in the spirit of fall I am busily creating some fall crafts that you can do along with your kiddos! So check out the upcoming blog:  Crafts with Kids for some fun projects ideas!!

Thanks for reading, and happy crafting!

Sunday, September 18, 2011

Bobby Pins

New Bobby Pins

Here are some new sets of bobby pins I have created! Each pretty is mounted to a 
nice quality bobby pin that are nice shiny silver!


Green Rose Bobbies!
Very pretty metal flower bobbies.
$3.50 for set


Pink Rose Bobbies!
Great metal flower bobbies.
$3.50 for set

Gorgeous Bobbies! have metal design with a jewel center!
$3.50 for set


Fun plastic flower bobbies. Flowers are plastic rimmed with metal.
$3.50


                            Jeweled flower bobbies and Necklace set!


Very pretty set!
Bobbies are pretty detailed leaves with a cluster jewel
center.
Neckace is made of two strands of chain, one silver and one dark silver
attached to a matching leaf and jewel charm. Necklace is  inches around.
Super cute
$13.75 for set!!